Wednesday, April 20, 2011

Best Vegan Mac and Cheese!!

Let me start by saying I love vegan cheese cough*Daiya*coughcough as much as the next gal, but I am working on eating healthier and a bunch of solidified oil isn't always the best way to do that. I got to thinking of other ingredients that could give the same richness and creamyness that dairy lends to mac and cheese, and I started thinking about one of my favorite foods of all time - Kabocha Risotto. If you haven't tried this yet WHAT THE HELL ARE YOU WAITING FOR?!?!?! In reality risotto works wonderfully with just about any squash you can get your hands on (well maybe not spaghetti but that's a different post all together!). The reason why Kabocha works so well is that when it is cooked it gets this dreamily creamy consistency. It's the same reason that it's one of my favorite soup ingredients. This breakdown happens with all squashes but I think it just happens faster with Kabocha making it oh-so easy and delicious! For those of you who are thinking "I have never heard of Kabocha squash in my life" it's also referred to as buttercup squash (I don't believe there's a definite difference between the two).


Anyways the result? HUGE SUCCESS!! However I don't plan on stopping here with Kabocha, as my brain is reeling with all the various uses for it - creamy salad dressings, oil-free hummus, reduced fat guacamole, the possibilities are endless! And using it can replace a good chunk of fat with a naturally healthy vegetable, meaning why not give it a shot!

In case you need any further proof that it is in fact as amazing as I am claiming it to be, here's a picture.
IMAG0365


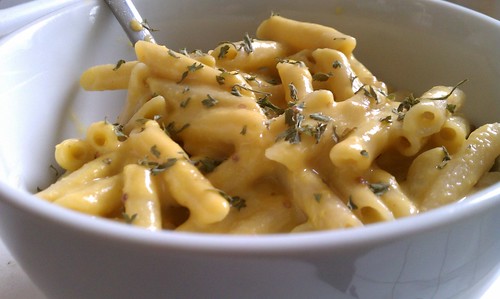
Ahhhh I have your attention now don't I? :-)

So I made this sauce yesterday and just tweaked it a bunch today and threw it on some brown rice pasta. I don't remember all the specifics but I suspect if you're reading this you're up to experimenting with it and playing around with the ingredients! A quick confession though - I did use about a Tbs of Earth Balance in this recipe although I don't think it was in any way shape or form necessary. Unfortunately it was one of the first ingredients I put in there and I don't think it added very much to the end product. If you'd like to add it I'd suggest adding it last so you can see if/how much you need!

Kabocha Cheeze Sauce

1 Kabocha Squash (roasted in 400 F oven until flesh was soft)
1.5 Tbs Tahini
1.5 Tbs White Miso
1 tsp Adobo Sauce (from the little cans of Chipolte Peppers in Adobo Sauce... save the chili's for later and just use the super flavorful sauce for this!)
1/4 cup Nutritional Yeast
1.5 tsp Garlic Powder (one clove of the good stuff if you have it on hand... we were out :-( ).
Dot of Earth Balance as needed (less than 1 Tbs)
Water to desired consistancey

Place roasted squash flesh into a food processor and pulse a few times. Add about 1/4 cup water to get things processing better. Here's the point where you start trying it to see how thick you want it. Cheese sauce? You'll probably need at least another 1/2 cup. Dip or spread? Start with another 1/4 cup and go from there. This part is really up to you, add slowly though as it'll be a pain if you get it too thin (ie you'll probably have to reduce it on the stove a bit or something). Add in the rest of the ingredients and process until silky smooth. Add any additional flavorings you'd like and enjoy!


A few notes:

Today I added a few drops of toasted sesame oil to this and let me tell you the flavor from those few drops of oil carried through the entire sauce! If you're looking for something to pack a ton of sesame flavor without a lot of oil give this a shot!

I REALLY REALLY REALLY liked adding sunflower seeds to mine today! This worked especially good with the pasta but I also added some to the rest of the sauce and enjoyed with carrots. The nuttiness works really well with the flavors. You could probably just add in a dot more tahini but I love the added crunch.

I also threw in way more adobo sauce today when I had it with veggies as I wanted it to have a little more of a kick!


Long story short - if you're looking to healthy alternatives to higher fat cheese alternatives give squash a try! You might end up as hooked as I am!


Monday, April 4, 2011

Quick Update!

As of today, I have been raw two weeks! The time is flying by and I honestly didn't expect it to be this easy! The only tough parts have been really long days where I can't really pack a lunch or head back to my apartment... not fun at all. But other than that I think I'm doing pretty good! I'm sleeping better (when school work isn't killing me), have more energy and my focus is getting a lot better!

I've also slightly changed the parameters of this raw experiment since I last posted. I am working on sticking to raw more so than I expected to. Why you may ask? It's so much faster and simpler! I spend far less time in the kitchen and end up more satisfied and eating really good food. I do have several pretty hard restrictions though, I'm not consuming sugar, wheat, alcohol or caffeine until I am done with school (May 3). I don't miss these things too much but there are days where I'd seriously kill for a muffin and coffee! Like I said before though, this raw lifestyle is an experiment, where I try to find the combination of foods that makes me feel my best, so hopefully I'll see a permanent change by the end of it and will be able to make a decision on how I want to proceed.

My mom visited yesterday and we had an AMAZING lunch with a very quick and simple salad - spinach, strawberries, walnuts and homemade balsamic vinaigrette! In total it took about 5 minutes to throw together and was incredible. I did hit up Whole Foods for dinner on Saturday though and had a pretty decent meal there too. I had a little tofu (cause it was a special occasion) and some really tasty southwest style mix between salsa and a salad. I also had the kale and tahini salad... which was straight out awful. I don't even know how but it was just terrible. Also at Whole Foods I also found KeVita, which was a genius buy. Not even taking into account that it has a ton of awesome probiotics, no sugar or other weird stuff, it's a REALLY REALLY tasty drink for 30 calories a bottle. I had the mango coconut and you can rest assured that the next time I see it I will be picking up more than one bottle! Their website is here http://kevita.com/ but as far as I can tell they're mainly just located in Whole Foods at the moment... hopefully they'll get distributed elsewhere soon as I'm pretty sure I live in the largest city on the eastern coast that doesn't have a Whole Foods less than 45 minutes away!

Anyways sorry for the rambling post! After two weeks raw, I can say this much, if you've been interested in it or kind of considered going raw in the past, GIVE IT A SHOT! No more waiting for tomorrow or for it to get easier, I swear if I can do it than anyone can!! <3

Wednesday, March 23, 2011

Going RAW!

So a few big changes around here, the number one being that I am focusing on going raw!! It's something I've always been fascinated with and am hoping it gives me a little extra energy to get through my last leg of college! I've been reading Crazy Sexy Diet by Kris Carr who funnily enough was the one who inspired me to make the switch from vegetarian to vegan. I'd strongly recommend the book as it's not only informative but supportive, not to mention a fun read!!

First, Logistics. I am not going 100% raw. I will still use both beans and whole grains (mainly quinoa). This makes my life a WHOLE lot easier and I strongly believe that both of those food groups are awesome for you. I'm mainly focusing on cutting out any and all processed foods, especially sugar and wheat and adding in lots more fresh fruits and veggies. Lately I've been in a kind of mental fog and I'm hoping cutting out the sugar will help eliminate that. I am also drinking store-bought green juice. If I were to get a juicer, I'd be looking for one that was able to handle leafy greens and I am pretty sure all those in my price range can't. I know it's not the best solution but I'm choosing only juices that are 100% juice (or puree) and contain no added sugar of any kind. My favorite of all time is Odwalla's superfood juice which I can't get enough of. It's really expensive around here though, so I've mainly been getting the Bolthouse green drink (I forget the name).


Second - What Have I Been Eating?
Well, this is only the third day of my raw excursion. I've been focusing on lots of raw greens, nuts and fruits. For example, today I've had a glass of juice and a grapefruit for breakfast, a cucumber with hummus for a snack, and an OMG SO GOOD IT WILL KNOCK YOUR SOCKS OFF massaged kale salad.

Confession: Kale is quite possibly my favorite food, but eating it raw always scared the shit out of me! I honestly don't know what I was scared off as it was way faster to make and really amazing!

Anyways it's only been three days but I am definitely feeling pretty good. It may be the diet and it may be spring poking its head out every now and then, but you won't find me complaining!

Oh another note about going to raw foods, if you're looking for a diet, there is NO hunger and NO guilt! Even with raw desserts, I've found them to be significantly more filling than processed or cooked ones and they're chock-ful of great nutrients too!


Sorry for the super rambling post! I'm also spastic and couldn't wait to eat the salad so there isn't a picture of it :-( I'm sure I'll be making lots of it in the future though so you'll probably see one soon. Just take my word for it - it's really pretty!

Raw Kale Salad

2 cups raw kale - cut to your desired preference (I am a wimp so mine was really really small)
1/2 lemon
1 smallish avocado (mine had a bad spot so it was probably more like 3/4)
1 scallion
1 handful sprouts
Pinch of pink sea salt
Garlic powder
Tinyest splash of olive oil

To start I put the chopped kale in a bowl and then added the juice of 1/2 a lemon. Then I got to work! I massaged it for probably five minutes, but go for as long or as short as you'd like. Then I added the avocado and massaged that in fairly well. Add everything else and you're good to go!

This makes a good size salad for one person and left me feeling completely full and satisfied!

Thursday, February 24, 2011

Best Popcorn Recipe EVER

First of it's been forever since I blogged.  Life's been getting in the way and school (my last year of college!!!) is seriously kicking my ass.

Now... I have an amazing recipe most of you have probably already made in some way shape or form... what can I say?  I'm slow and stubborn sometimes.  

For those of you who for some reason have not tried making popcorn on the stove here are some pretty great reasons you should try it:
  1. IT"S CHEAP!!  Even if you buy organic kernels it only takes a tablespoon or two to make the equivalent of that microwavable crap.
  2. It's harder to burn!  It would seem like it would be way easier to burn popcorn on the stove but trust me, I have burned far too many bags either due to terrible microwaves or being a space case.
  3. There are fewer unpopped kernels.  I'm sure this is how it's supposed to work in the bags too but it actually works on the stove.  All the kernels fall to the bottom of the pan as you shake the pan while it's cooking.  
  4. You can control the flavor!  Want super buttery vegan popcorn and don't trust the "natural flavors" of bagged kind, you can Earth Balance til your heart's content.  My recipe here is for nacho-cheezey popcorn that I used as an excuse to get some extra B-12 into my diet :-)
  5. It's healthier.  You control the ingredients... no more congealed salt and oil coating your popcorn.  Instead use olive oil or Earth Balance and spice it up!
  6. It's faster to make large quantities.  I make homemade popcorn all the time for friends cause it's stupidly cheap, fast, delicious and is generally something everyone will like.

Yeah I don't really have any downsides except maybe the fact that I tried to make kettle corn and it's an experience I don't want to talk about.... I will say this much though, if you give it a chance wear protective gear.  REALLY.  You need to stir it constantly and the popcorn will go flying with molten sugar... it's not fun and you'll probably get burned.  That may have just been me failing miserably or following a bad recipe, but I'm not going to try it again.


Ok now to the part you're all waiting for - RECIPE!!
The first part is more of a method for cooking it while the second is a recipe.

POPCORN ON THE STOVE

Ingredients
Canola Oil
Popcorn
Toppings (see below)

Before getting started be sure to have a pot that has a lid that fits (this is my biggest problem!)

Start pan heating up on medium-high heat, and add enough canola oil to very lightly coat the bottom of the pan (add less than you think you need and try swirling it around - when the pan's hot you should be able to use less than you thing).

Add in enough popcorn to create a SINGLE layer of kernels on the bottom of the pan.  Note:  if you have a pan with a ginormous diameter and is fairly short - don't add as many kernels (you'll be dealing with overflow in a few minutes if you do).

Cover the pan and shake to coat all the kernels in oil and let it do it's thing!  I usually shake the pan every now and then.

Wait til the popping slows down and empty contents out into a serving bowl (do this fairly quickly as it will burn if you leave it in the pan for too long).

Add toppings and ENJOY!!!! :-D


NACHO CHEEZEY TOPPING
This couldn't be simpler.

I melt about 1.5 tbs of Earth Balance in the micro (use more or less depending on how you like it) and then add about 2tsp paprika, a tsp garlic powder and a good dash of salt to the butter and stir well.  Dump this mixture on the popcorn and stir to incorporate.  Throw on a heaving tablespoon of nutritional yeast and once again mix to incorporate.

For other flavors simply change up what you mix in with the Earth Balance.  This parsley garlic salt that my friends have ALWAYS goes over well, but curry or garam masala or chili powder would all be incredible too.  The options are endless!

Hope you guys give stovetop popcorn a chance!!!